The icon bar Standard offers functions normally accessed via File and Edit. (figure "standard bar")
These functions exist:
- Open

- Save

- Undo

- Redo


The icon bar View gives faster access to navigation and view options. These individual functions are also available in the respective menu bar. (figure "view bar")
The navigation icons have the following functions:
- Adjusting model size to window size
 (fit)
(fit) - zooming in a user-defined rectangle
 (zoom box)
 - zooming in and out
 (zoom in/out)
 - rotating your model
 (rotate)
- panning the displayed area
 (pan)
(pan)
The view icons allow you to select:
- different views utilising wireframes:


- shaded view

- views from different directions

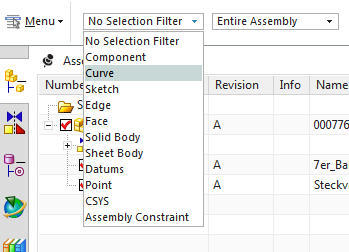
With the Filter-Function ![]() , you can select specific elements. Adjusting your filter makes all other types of elements unselectable. You can find the filter-function on the upper left below the start-menu. (figure "Filter")
, you can select specific elements. Adjusting your filter makes all other types of elements unselectable. You can find the filter-function on the upper left below the start-menu. (figure "Filter")
On the left of the screen you can find tabs for viewing assembly structure ![]() (Assembly Navigator) and model structure
(Assembly Navigator) and model structure ![]() (Part Navigator). There is also a tab that shows your history
(Part Navigator). There is also a tab that shows your history ![]() .
.
You can adjust number and contents of ribbon tabs individually. To do so, right-click the grey area next to the ribbon tabs and choose Customize... (Strg+1). You can now customize the displayed icon bars in the window Customize.
The GUI already contains the icon bars required for this excercise. In modeling mode you will use the icons of modeling. (figure "Modeling")
To switch to Modeling mode, click File -> Modeling
The necessary icon bars are:
- Selection Bar
- Standard
- View
- Utility
- Exploded Views
- Feature
- Direct Sketch
- Assemblies
- PMI
To switch to Drafting mode, click File -> Drafting (figure "Drafting")
The necessary icon bars are:
- Selection Bar
- Standard
- View
- Utility
- Assemblies
- Tables
- Exploded Views
- Drawing
- Annotation
- Dimension
- Sketch Tools
- Drafting Edit
In order to permanently save any changes to the menu and icon bars, you have to export them as a file to your user directory. (drive H:). To do so, click File -> Preferences -> User Interface or press Strg+2 and save your changes (so called "Role"). (further information in chapter 3.4. Roles)
| Attention: |
|