In this exercise you'll learn about the feature Threaded Hole.
It is used for adding threads to holes.
Create a block with the dimensions: 100mm x 100mm x 50mm.
Now you should create two threaded holes for M10 threads.
Select the feature Hole ![]() . Subsequently, set the upper drop-down menu to
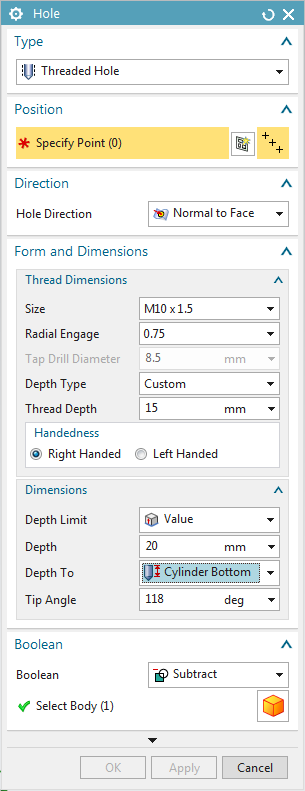
. Subsequently, set the upper drop-down menu to  . (refer figure "Threaded Hole")
Below Thread Dimensions you can set prefernces for the thread. In this case we want to create a M10 thread, so choose ![]() . As depth you can now select a predefined value, that is referred to the diameter of the hole, as stated in DIN76. However, here you should create a thread with custom depth, so select
. As depth you can now select a predefined value, that is referred to the diameter of the hole, as stated in DIN76. However, here you should create a thread with custom depth, so select  and enter 20mm.
Below Dimensions you can now edit preferences for the hole. You'll find the same options as previously described in chapter 4.2.3.1 "Hole (ger. "Bohrung")". In ![]() , set 30mm as depth and the default tip angle of 118°.
, set 30mm as depth and the default tip angle of 118°.
Via Start Chamfer and End Chamfer you can specify if you directly want to add chamfer to the start or end of your hole. Since this is a blind hole, we de-select Enabled for End Chamfer. From now on you should decide on your own if chamfers are necessary for a specific hole.
The thread is only represented symbolically, with the blue dashed line. This significantly reduces CPU usage.