In this exercise you will learn how to change the position of existing views.
Move/Copy views
Select Move/Copy View  under Edit -> View -> Move/Copy ....
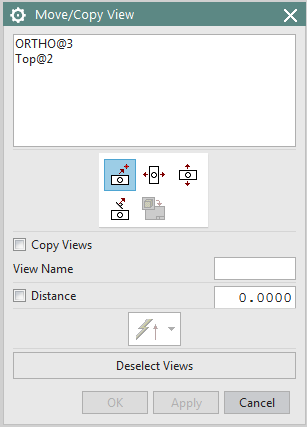
In the Move/Copy View window, you can make a selection for copying and moving views. (see figure "Move Copy View")
The window is structured as follows:
- Selection window for views
- Moving in predefined directions
- Copying the views using Copy Views. To do this, enter the name of the view copy in the View Name field.
- Under Distance an exact offset distance can be defined.
- The vector definition menu follows.
- The Deselect Views key can be used to deactivate a selected view.
Shifting directions:
| Move/Copy to point | |
| Horizontal move/copy | |
| Vertical move/copy | |
| Move/copy along a vector | |
| Move/copy to another drawing |
| Attention: | You should try to maintain orthogonality between views. There are only a few exceptions where it makes sense not to do so. |
Align views
Now deliberately move the view so that the orthogonality is lost.
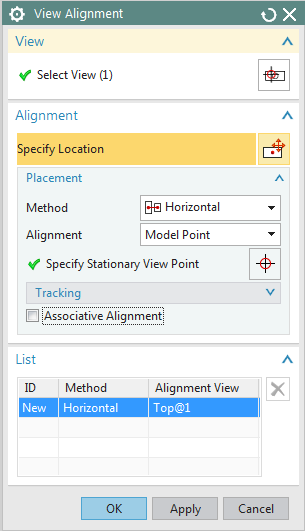
Randomly shifted views, which no longer correspond to the orthogonal conditions, can be aligned in relation to any views via Edit -> View -> Alignment or via View Alignment (see figure "View Alignment")
The previously vertically shifted view should now be aligned horizontally to the basic view.
- Select the view to align.
- The choose Horizontal, as the view should be aligned horizontally.
- As the Align method, select Model Point from the dropdown list. The view is aligned according to a selected geometry point (e. g. corner point). This method is to be preferred!
- Select the center of the basic view by clicking on a circle.
- If you also want to create an association, activate the checkbox Associative Alignment.
- Confirm with OK