TU Darmstadt » MB » Deparment DiK » Education »
Simulation of production systems and processes using Tecnomatix Plant Simulation 11
Single processing and assembly
The  single processing performs an "action" on material units. Action is a generic description for one or multiple task like turning, milling or washing. For the task you can define every desired level of granularity.
The ![]() assembly combines different material units.The assembly either moves the entering material units to the main material unit or creates a "combined" new material unit instead.For dismantle material units, you can use the dismantle station which is not further considered in this tutorial.
assembly combines different material units.The assembly either moves the entering material units to the main material unit or creates a "combined" new material unit instead.For dismantle material units, you can use the dismantle station which is not further considered in this tutorial.
Enhance your simulation model
Task:
Create the single processing stations:
- The piston rod is turned (Turning), washed (Washing) and measured (Measurement).
- The housing cover is cutted to length (Cutting), washed (Washing) and measured (Measurement).
- The washing and measurement of both parts can be performed using the same single processig station. Therefore ony create one station.
- Use the manufacturing frame (Manufacturing) for these in-house production and to hierarchically structure your simulation model.
Create the pre-assembly stations:
- The piston rod, the screw nut M10, the washer M10 and the pre-assembled piston are assemblied (Assembly).
- The housing cover, the plain bearing and the dirt deflector are pre-assembled (Assembly).
- Use the appropriate sub frames (PreAssembly_HousingCover and PreAssembly_PistonRod).
Create the assembly stations:
- The housing, the housing base, the housing seal, the socket screw M8x20, the pre-assembled housing cover and the pre-assembled piston rod are assembled. The assembled material unit is a pneumatic cyclinder.
- Always 2 assembled peumatic cylinders are loaded to a container (Loading). Configure the pay load of the station. The container stays the main material unit of the assembly station.
- Use your main simulation model (Frame).
Step-by-Step:
- Double-click on the Manufacturing frame to open it.
- Insert the single processing stations and open each station to name it appropriate to the list above (see figure 1).
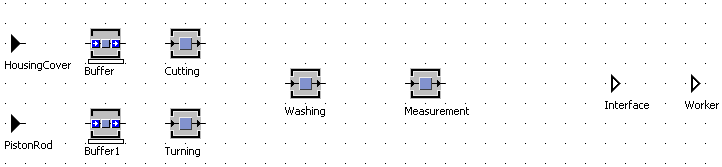
Figure 1: Manufacturing frame
- Double click on the PreAssembly_HousingCover frame to open it.
- Insert the assembly stations and open each station to name it appropriate to the list above (see figure 2).
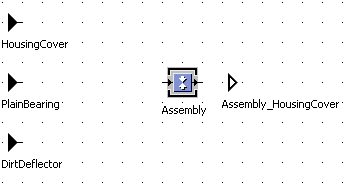
Figure 1: PreAssembly_HousingCover frame
- Double click on the PreAssembly_PistonRod frame to open it.
- Insert the assembly stations and open each station to name it appropriate to the list above (see figure 3).
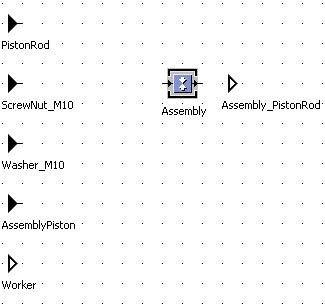
Figure 1: PreAssembly_PistonRod frame
- Return to the main simulation model (Frame).
- Insert the assembly stations and open each station to name it appropriate to the list above (see figure 4).
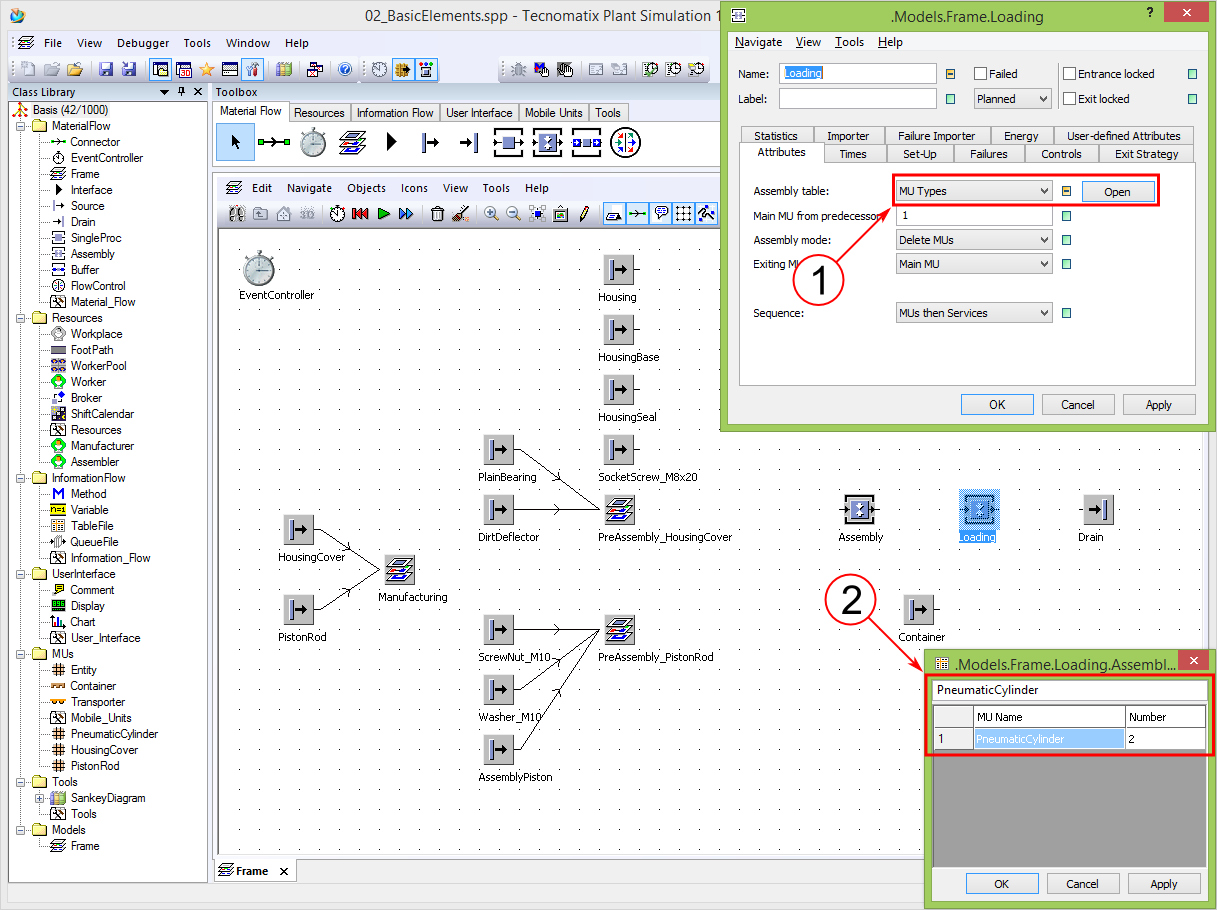
Figure 4: Main frame
- Open the Loading assembly and select MU Types as Assembly Table (see figure 4)(1). Instead of assembling one part of each predecessor, the assembly station assembled the material units accoring to a given table.
- Open the assembly table by click on the Open button (1). Insert the material units which have to be added the main material unit (Container). In this case alway 2 "PneumaticCyliner" are put to one container. The MU Name refers to the name of the material unit which is derived from the class element (2).
- In the loading assembly the main part for example the container is foreworded to the next station. In case that you want to create a "new" product, you have to explicitly configure the station. Open the Assembly station (see figure 5). Select
"New MU" for the menu entry "Existing MU" (1) and input the name of the MU that you want to create. In this example input ".MUs.PneumaticCylinder" (2). Alternativ you can drag and drop the material unit's class element to the input field.
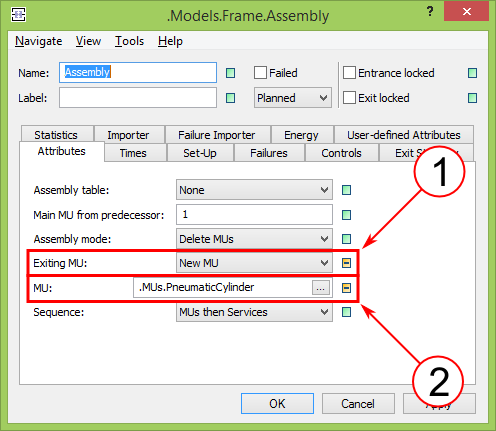
Figure 5: Assembly station